


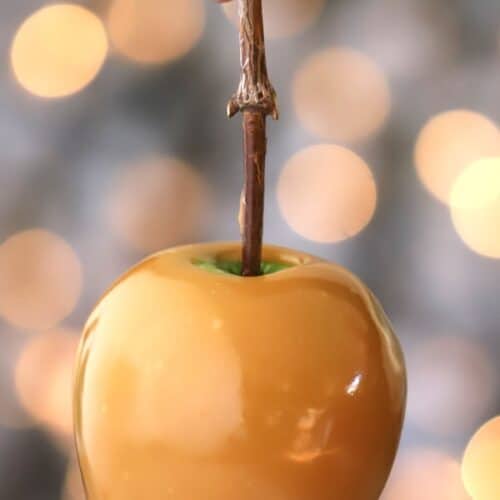
These Homemade Caramel Apples are easy and so fun to make. This recipe will show you how to make caramel apples including our easy caramel recipe, decorating ideas, tips, and more.
These are perfect for serving at parties or giving away as gifts and will quickly become a favorite family tradition. If you’re looking for more homemade caramel recipes, be sure to try our Best Caramel Dessert Recipes.
Why You’ll Love This Recipe
- Fun and Festive: A classic fall activity for families, parties, holidays, and gifts.
- Simple Ingredients: Uses fresh apples and your favorite toppings.
- Make-Ahead Friendly: Great for gifts, bake sales, or entertaining.
Homemade Caramel Apples
This is a complete guide to making caramel apples from scratch. I’ll give you step-by-step instructions with pictures, videos, and tips on how to make the best caramel for caramel apples, which apples to use, and so much more. Before you know it you will be the go-to caramel apple expert.
Email This Recipe
Get a link to this recipe emailed so you can save it for later + get all the latest Carefree Kitchen recipes!
By submitting this form you consent to receive emails from The Carefree Kitchen
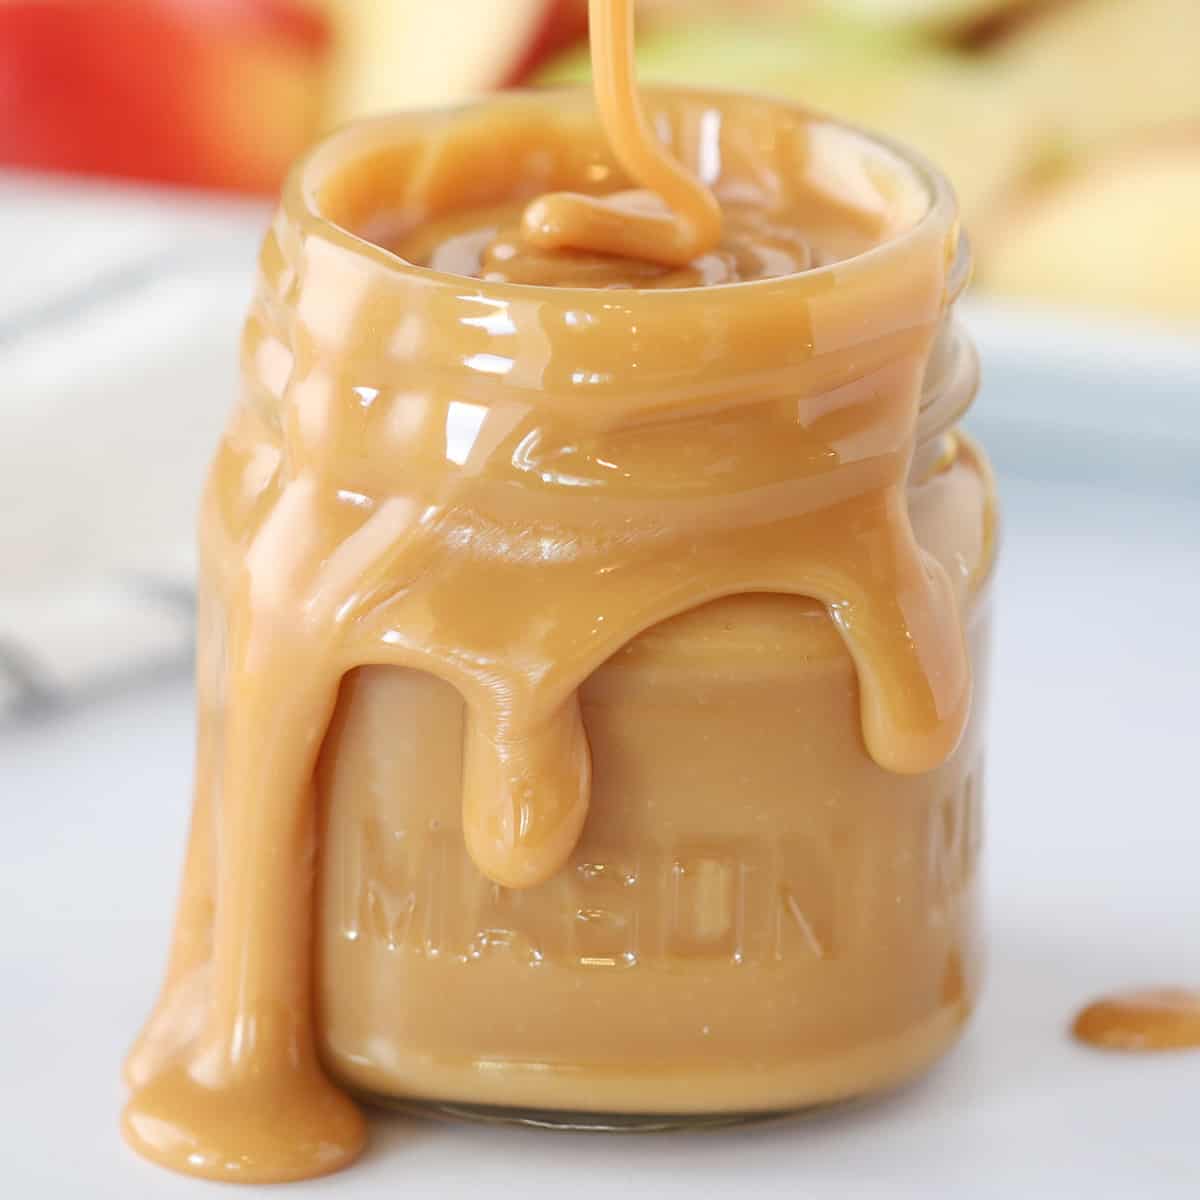
Dipping and decorating caramel apples is one of our family’s highlights of the fall season. It’s become a family tradition at our house every year. There’s something satisfying about making the smooth, creamy, perfectly sweet caramel from scratch. Everyone will love decorating their own apples with their favorite toppings.
Homemade Caramel Apple Video Tutorial
Preparing the Apples
Unless you pick your own or purchase organic apples, you’ll want to remove the wax. Otherwise, you will have difficulty with the caramel sliding off of the apple.
You will know it’s working if your water turns a little murky once you begin to rub the wax off with your fingers. Here are the two main ways I like to do it:
- Vinegar Method: Wash apples to remove any wax by soaking in a half-gallon of water with 1 cup of white vinegar for about 10 minutes, then rubbing with your fingers to remove the wax. Rinse the apples well, then dry completely with a dish towel or paper towel.
- Warm Water and Towel: You can also wash your apples in warm water and then vigorously rub your apples with a rag to remove the majority of the outer layer of wax. Be sure to lay them on a towel to air dry before dipping the apples in caramel. The apple must be very dry for the caramel to stick.
Key Ingredients
- Butter – you can use either salted or unsalted butter for the caramel, depending on your own personal taste.
- Sugar – you will need a combination of both white granulated sugar and brown sugar for this caramel. Dark brown will have a little stronger of a molasses flavor than light brown.
- Karo Syrup – this keeps the caramel from crystallizing while it cooks. If you can’t find Karo Syrup, you can substitute light corn syrup.
- Sweetened Condensed Milk – this makes the caramel super creamy and soft.
- Apples – use crisp, tart apples such as Granny Smith, Fuji, or Honeycrisp. Make sure they are free of bruises and brown spots.
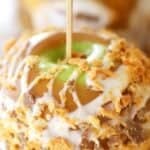
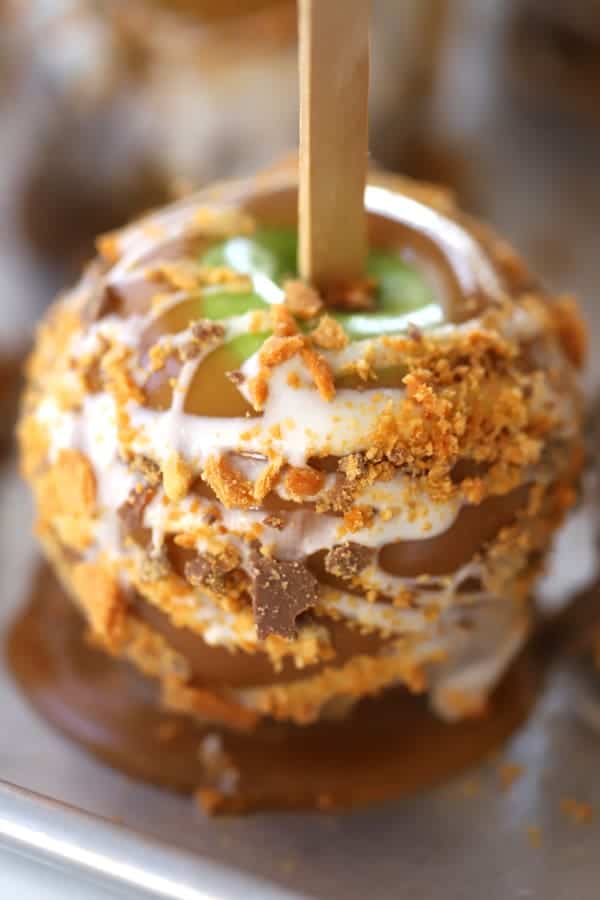
- Toppings – some of our favorite toppings include chopped nuts, crushed candy-like Butterfinger, and sprinkles.
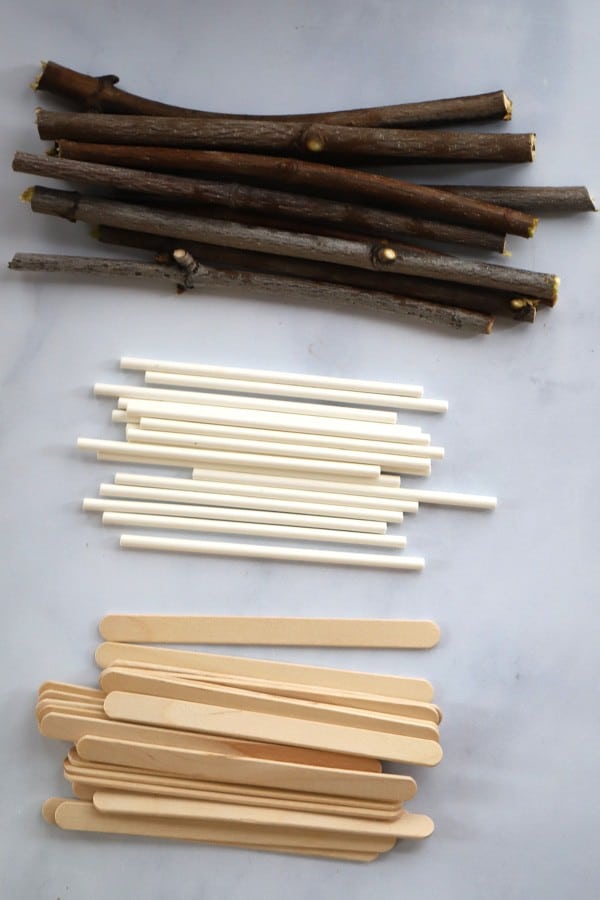
Caramel Apple Sticks
There are many different options here. You can find an assortment at your local craft store, square sticks, popsicle sticks or dowels, cut down to size.
- Popsicle sticks: These are our preferred sticks to use because they are sturdy and can bear the weight of a large caramel apple.
- Lollipop sticks: These work great, too, but if you have a heavy caramel apple, they tend to bend.
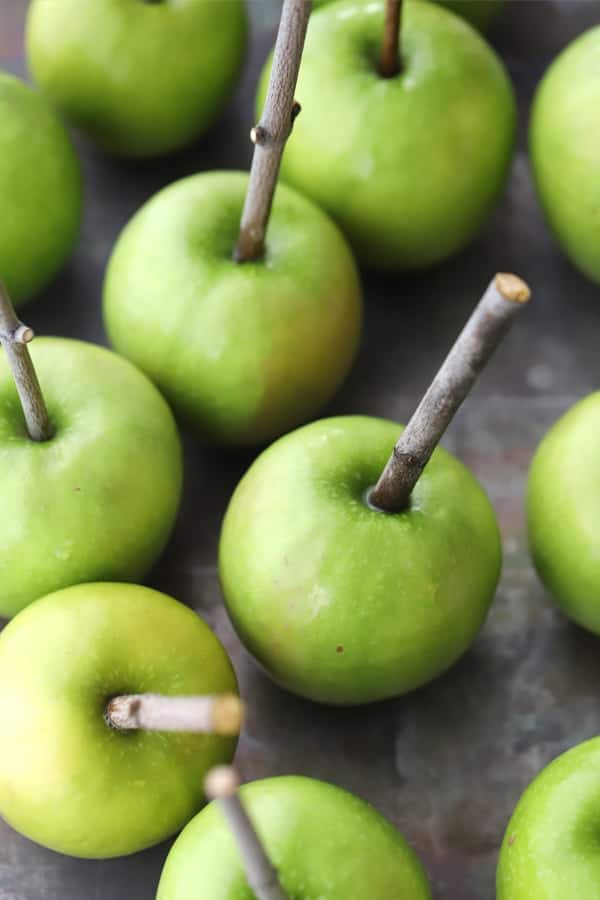
- Tree branches: It’s a little bit of a hassle but they are so cute! Just sanitize your pruning shears with vinegar before you cut the branches. You may also want to rinse the branches in the vinegar water after you’ve washed the apples, making sure to rinse the sticks to remove any vinegar smell.
Topping Ideas
- Sprinkles
- Crushed Candy Bars
- Chopped Nuts
- Crystal Sugar
- Mini M&Ms
- Crushed Oreos
- Melted Candy Wafers (choose a color to celebrate your favorite holiday)
- Drizzled Melted Chocolate
- Toffee Bits
How To Make Caramel Apples
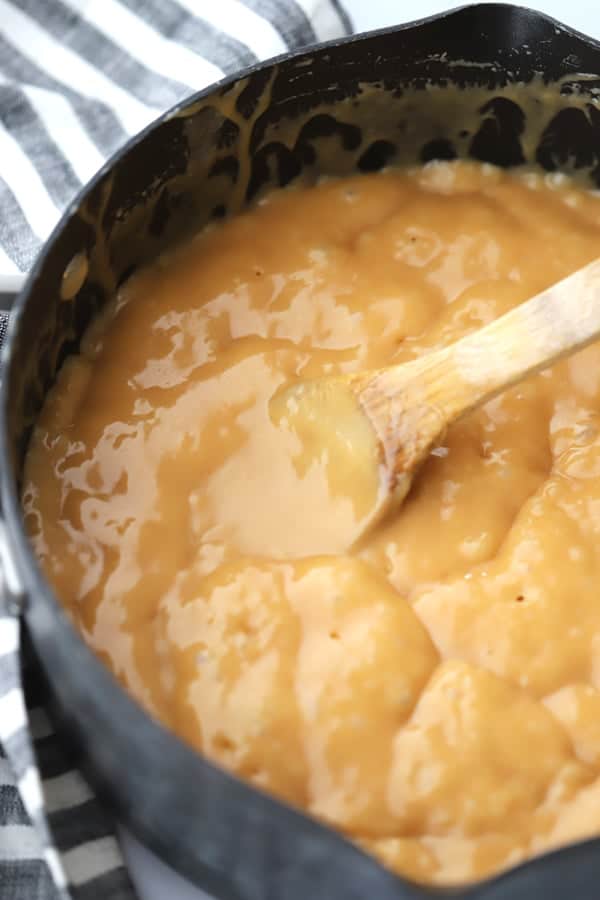
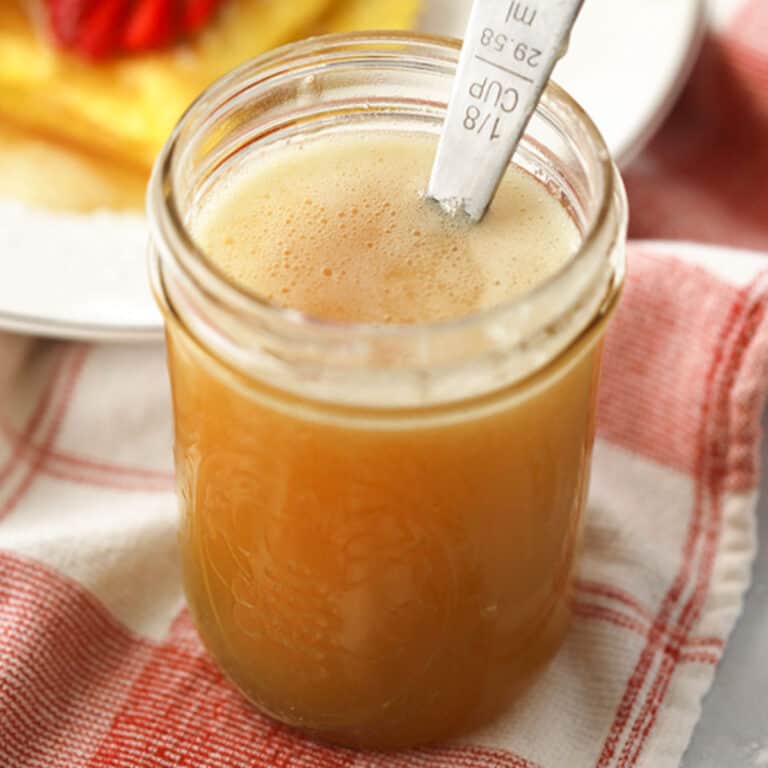
- Cook the caramel. In a large nonstick Dutch oven pot over medium heat, add the butter. Melt, then add the sugar, brown sugar, Karo syrup, and sweetened condensed milk and bring to a boil while stirring constantly. Cook until it reaches 240 degrees F, using a candy thermometer to check.
- Let the caramel cool. As soon as it reaches 240 degrees F, take the caramel off the heat and stir in the salt and the vanilla, then let the caramel cool for about 10-15 minutes.
- Prepare the apples. Be sure to wash and dry the apples first, then add the sticks. Line a baking sheet with parchment paper and set aside.
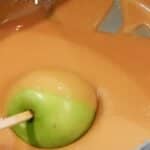
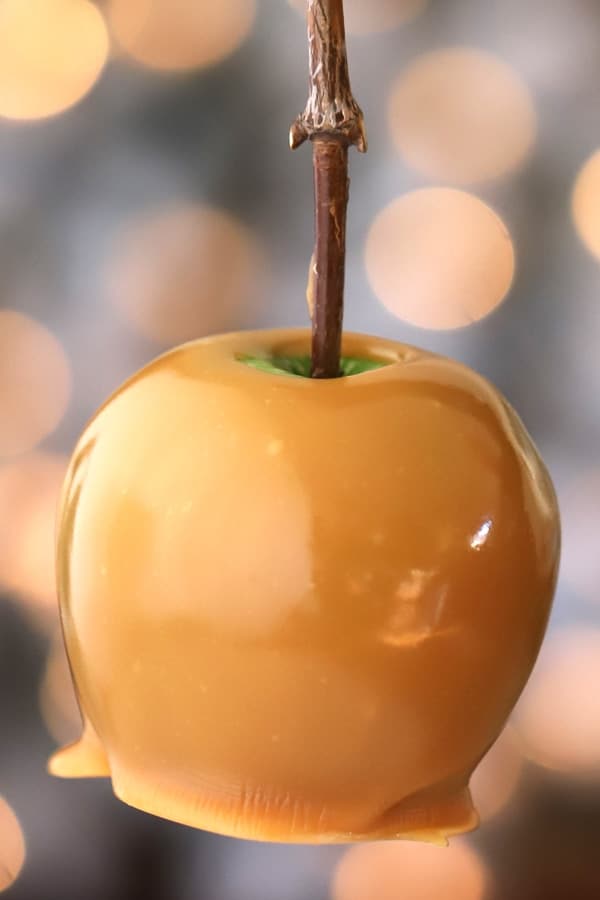
- Dip the apples. Carefully dip each apple into the hot caramel all the way up to the stick, then lift it out of the caramel and swirl gently to let the excess caramel drip back into the pot. Repeat with the remaining apples.
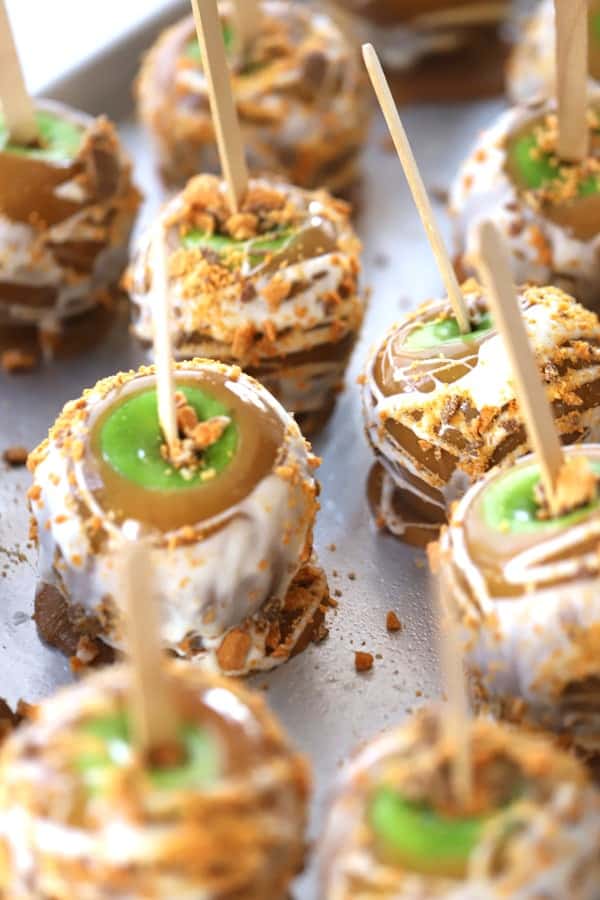
- Add toppings (if desired). Roll each apple into your favorite toppings before the caramel sets.
- Let the caramel set. Place the caramel-dipped apples onto your prepared baking sheet. Let the apples cool at room temperature until the caramel has set.
- Store. Keep in the fridge, loosely covered, for up to 3 days, or enjoy immediately!
Recipe Tips and Variations
- Choose your apples wisely: Start with firm and crisp apples, such as Granny Smith or Honeycrisp. Their tartness balances the sweetness of the caramel. Avoid soft or bruised apples.
- Be sure to clean and dry the apples: Wash the apples thoroughly to remove any wax or dirt. Dry them completely before dipping them into the caramel to ensure proper adhesion.
- Let excess caramel drip off: Hold each apple by the stick and dip it into the melted caramel, twirling it slowly to ensure even coating. Lift the apple out of the caramel and let the excess drip off so that you aren’t left with a puddle of caramel under each apple.
- To individually wrap the apples: Once the caramel has fully set, you can wrap each apple individually in wax paper or cellophane bags. This not only adds a decorative touch but also helps keep the caramel apple fresh and prevents them from sticking.
Frequently Asked Questions
You want to cook your caramel to 240 degrees F. At this temperature, the sugar in the caramel will have reached the softball stage, which means it will be flexible yet slightly firm.
A candy thermometer is the only way to accurately know when you have reached the correct temperature so we highly recommend investing in one if you plan to make homemade caramel.
Most of all, you want to use an apple that is firm, crisp, and is without any soft spots or bruises. These are some of my favorites:
–Granny Smith Apples- crisp, tart, and balances well with the buttery, sugary soft caramel. Granny Smith Apples are the gold standard because they are firm, crisp, and very tart.
–Honey Crisp Apples- slightly sweeter than Granny Smith apples and almost as firm and crisp. Keep in mind that the shelf life for Honey Crisp apples isn’t quite as long as Granny Smith.
–Gala Apples- These will work too. They don’t have quite the flavor punch as a granny smith or Honey crisp but make a great caramel apple.
The most likely reason that caramel doesn’t stick to your apples is if you skipped the washing step. Apples have a waxy residue on them that will repel even the hot caramel unless it is removed.
Storing and Reheating
- Refrigerator: Store your caramel apples loosely covered in the refrigerator for up to 1 week.
- Leftover caramel: You can store leftover caramel in an airtight container in the fridge for up to 2 weeks. To reheat, just pop in the microwave or warm over low heat stirring constantly.
More Caramel Dessert Recipes You’ll Love
Homemade Caramel Apples Recipe
Ingredients
- 12 whole granny smith apples
- 12 lollipop sticks, or popsicle sticks
Homemade Caramel for Caramel Apples
- 1 cup butter
- 1 cup sugar
- 1 cup light brown sugar
- 1 cup karo syrup
- 1 can sweetened condensed milk
- 1 teaspoon vanilla extract
- 1/4 teaspoon salt
Toppings for Caramel Apples
- 2 cups chocolate wafers, white or milk chocolate, melted
- 1/2 cup toppings, sprinkles, crushed candy bars, crystal sugar, etc.
Instructions
Prepping the Apples
- Wash apples to remove any wax by soaking in a half gallon of water with 1 cup of white vinegar. Dry completely with a dish towel or paper towel.
- Remove the stem of each apple and insert a wooden dowel or lollipop stick into the top, about 3/4 of the way through.
- Line a baking sheet with parchment paper and set the apples on top.
Making the Caramel
- In a large nonstick Dutch oven pot over medium heat, add the butter and melt. Once melted, add the sugar, brown sugar, Karo syrup, and sweetened condensed milk and bring to a boil.
- Stir constantly while cooking at a rapid boil until it reaches 240 degrees F. Watch closely and do not cook higher than 240 degrees F or the caramel will be too thick to dip the caramel apples.
- Take the caramel off the heat and stir in the salt and the vanilla, then let the caramel cool for about 5 minutes before dipping.
How to Dip Caramel Apples
- Carefully take each apple by the stick and dip into the hot caramel all the way up to the stick, then lift it out of the caramel and swirl gently to let the excess caramel drip back into the pot. Once dipped, set each caramel dipped apple onto your prepared baking sheet. Repeat with the remaining apples, letting the caramel cool to room temperature.
Decorating the Apples
- Drizzle melted chocolate on each caramel apple. Roll in sprinkles, crushed candy bars, or cookies.
Storing Caramel Apples
- Keep in the fridge, loosely covered, for up to 1 week. Enjoy!
Video
Notes
- Storing caramel apples: store your caramel apples loosely covered in the refrigerator for up to 1 week.
- Storing leftover caramel: you can store leftover caramel in an airtight container in the fridge for up to 2 weeks. To reheat, just pop in the microwave or warm over low heat stirring constantly.
- Pro tip: When cooking caramel, it helps to use a square wooden spoon so you can scrape the bottom of the pan while stirring.
Nutrition
Did you make this?
Don’t forget to leave a rating below and make sure to follow on Pinterest, Instagram and Tiktok for more!
More Of Our Favorite Apple Recipes
- Apple Cinnamon French Toast Bake
- Cream Cheese Caramel Apple Dip
- Caramel Apple Snowmen
- Sausage and Apple Stuffing
- Caramel Apple Crisp with Oat Topping
- More Best Caramel Recipes
- More Holiday Recipes
This recipe for Homemade Caramel Apples is easy and so fun to make. I’ll show you how to make homemade caramel, how to drizzle chocolate, and add your favorite candy topping.
Categories:
Candy, Desserts, Fall Recipes, Gluten-Free, Halloween, Holiday Favorites, Nut-Free, Thanksgiving, Vegetarian, Videos, Winter Recipes,
These don’t come off the pan well, any tips? Plus, I cooked to 240 degrees but they are a little chewier than I’d like. What would you recommend?
As far as coming off the pan, be sure to butter (use actual butter) the pan really well. If they’re a little chewier than you’d like, cook them to 235 next time and the caramel will be softer.
The recipe was perfection in making our caramel apples. The caramel set up so wonderful. I will say that once these are dipped in the caramel you need to do any topping right away. They set up fast. I will save this recipe and use every year for our annual caramel dipping party.
I haven’t had a caramel apple in years, made this recipe for a party. These turned out so good. Wow! I need them to last beyond a few days though, so I wrapped each one in parchment paper that was sprayed with non stick oil, then wrapped tightly with plastic wrap and sealed as best I could with individual baggies and set in fridge. Hope they keep… Thank you for this recipe. Ps. I did not add the vanilla, salt or gourmet items- just plain and yummy!!
What a fun recipe! I’m excited to make these caramel apples this fall!
My kids and I had fun making this recipe. We’re going to make them again for a Halloween party. Thanks for sharing!